

Project Overview
Blood Moon Rituals is a student short film project in whichwas designed as a contained supernatural horror short set in Winona, Kansas, USA, in 1987, with the visual objective of creating a convincing period environment despite working with a small crew, a limited physical set, a single-day shoot, and an extremely compressed post-production schedule.
The film follows a man living alone in an isolated house surrounded by tall grass who discovers an occult book while having dinner. As a blood-red moon appears outside the house, the atmosphere changes, the book activates a supernatural presence, and a demonic entity emerges. The sequence escalates into a violent head-burst event, extensive blood effects, and finally a portal through which the demon removes the victim's body. The film ends with the blood-covered environment, the red moon, and the demon disappearing through the portal.
The central technical challenge was not simply to create individual VFX shots, but to make a relatively small physical set function as a much larger location. The production therefore relied heavily on matte painting, 2D set extension, chroma-key compositing, roto, tracking, CGI environment construction, Unreal Engine rendering, practical lighting, digital clean-up, and digital intermediate.
The final film has a runtime of 7 minutes 36 seconds including credits, with a 2.35:1 presentation aspect ratio, 1920 × 1080 resolution, and 24 fps acquisition. Principal photography was captured on a Canon EOS R6 using a 35 mm prime lens, with the camera recording in Canon Log 2 for DI in DaVinci Resolve Studio later.
worked as the director and writer of the project and was responsible for the complete post-production pipeline. This included VFX supervision, CGI, Unreal Engine environment work, compositing, matte painting, rotoscoping, tracking, clean-up, colour correction, colour grading, editorial, sound design, title design, presentation development, and production documentation. I also developed the project's visual language, moodboards, treatment, storyboard methodology, shot-specific VFX planning, set-extension requirements, environment direction, and post-production strategy.
Because the post-production work was handled by me as a solo artist, the project effectively required me to operate across multiple departments that would normally be distributed across a larger production team. Every shot therefore had to be planned not only according to its narrative purpose, but also according to what could realistically be executed within the available time, crew size, physical set, and post-production resources.
Visual Treatment
The film was conceived around a simple supernatural horror premise, but the visual execution was deliberately treated as an environment and atmosphere problem rather than only a narrative problem. The house needed to feel geographically specific, isolated, period-appropriate, and physically believable before the supernatural elements were introduced.
The location was established as a remote rural property in Kansas surrounded by tall grass. During pre-production, references from real Kansas landscapes and surrounding rural architecture were gathered to understand the vegetation, spatial scale, exterior colour relationships, building proportions, and general environmental character that could support the story.
The decision to place the narrative in 1987 also affected the visual language. The environment, production design, lighting, colour treatment, props, and compositing were all developed to avoid a visually contemporary appearance. The final grade therefore incorporated controlled film-emulation characteristics to push the digital footage toward a more period-oriented cinematic response.
The horror aesthetic was influenced by the visual language of the Evil Dead franchise, particularly its treatment of isolated interiors, occult objects, supernatural transformations, practical-looking blood effects, and increasingly hostile environments. These references were used as a visual starting point rather than as a direct reproduction of any particular shot.

Exterior Establishing Shot — Golden-Hour Grade: Warm highlight roll-off and controlled shadow density establish the house against the field while retaining atmospheric separation in the sky.
The visual treatment was built around a contrast between an initially subdued domestic environment and an increasingly oppressive supernatural atmosphere. The house begins as a believable but isolated living space and progressively becomes contaminated by the presence of the blood moon, the occult book, the demon, and the physical aftermath of the ritual.
A major component of the visual language was the use of red as a narrative lighting element. Rather than treating the red moon only as an external visual effect, the production introduced red light physically on set using lighting fixtures fitted with red gels. This created motivated red illumination directly on the actor, practical set elements, and surrounding surfaces, giving the later digital enhancement a physical foundation.
The practical red lighting was intentionally retained during the DI process and selectively exaggerated in DaVinci Resolve. This approach was important because generating the entire effect digitally would have created a visually disconnected source of illumination. By capturing the red interaction in-camera and then extending it digitally, the supernatural lighting remained integrated with the photographed material.
Pre-Production and Visual Development
The project had approximately three weeks of pre-production. The primary objective of this phase was to eliminate avoidable production problems before the camera was turned on. Location research was performed using photographic references and map-based research to understand the visual characteristics of Kansas and determine how the environment could be recreated around the physical set. References were collected for rural houses, surrounding vegetation, building materials, windows, interior architecture, atmospheric conditions, and general environmental scale.
The pre-production process also established the film's visual treatment before construction and shooting began. The set layout, colour relationships, window placement, practical lighting, exterior visibility, and planned CG extensions were considered in relation to the final composite rather than as isolated production-design decisions. This was particularly important because the physical set was intentionally smaller than the final environments shown on screen. Every visible area had to be evaluated in terms of whether it would remain practical, be extended through matte painting, be replaced digitally, or be constructed in Unreal Engine.
Custom Storyboard and Shot Planning System
A custom storyboard format was developed specifically for this production. Instead of treating the storyboard only as a visual reference, each shot was documented as a compact technical specification. Every storyboard frame contained the intended composition along with the corresponding section of the script, the action taking place within the shot, the required VFX and CGI work, on-set decisions, lighting direction, approximate lighting conditions, time-of-day information, and other production notes. This approach allowed the storyboard to function as both a creative document and a VFX planning document. Before production began, the team could identify which portions of the frame would exist physically, which would require chroma replacement, which would be matte painted, and which would ultimately be constructed in CG. The complete shot plan was then supported by the shot list, camera logs, sound logs, and production notes, covering approximately 15 principal shots.
Camera and On-Set Capture
Principal photography was captured using a Canon EOS R6 with a 35 mm prime lens and a full-frame sensor measuring approximately 35.9 × 23.9 mm. The project was photographed at 24 fps and recorded in Canon Log 1 to preserve latitude for subsequent colour correction and grading. Most shots were designed around relatively stable tripod-based compositions, which simplified the tracking and matte-painting requirements. A limited number of shots introduced controlled camera movement using a track-based setup, including a gradual dolly-style movement. The opening shot was particularly important from a VFX perspective. The camera was positioned near the main entrance while a chroma-covered area outside the doorway represented the future exterior environment. This provided a clean region for environmental replacement and allowed the doorway to become the transition between the practical interior and digitally constructed exterior world. The decision to maintain generally controlled camera movement was deliberate. With a compressed post-production schedule and a solo VFX workflow, unnecessary camera complexity would have increased tracking, roto, and stabilization requirements without materially improving the storytelling.


Doorway VFX Plate — Keying & Environment Replacement: Green-screen isolation and edge refinement prepare the doorway for compositing, with perspective and lighting matched to the interior plate.
Chroma-Key and Rotoscope
Chroma was used strategically for areas where the final environment could not be produced practically, particularly around exterior views and selected full-environment shots. The chroma material was isolated in After Effects and combined with the matte-painted or Unreal Engine environments. Rotoscopy was used where subjects or individual objects needed to be separated from the photographed background. Because many of the shots contained practical lighting from the red gels, the chroma extraction had to remain compatible with the existing colour contamination and edge characteristics of the footage. The compositing therefore relied on a combination of keying, roto refinement, edge treatment, tracking, and colour balancing rather than treating the chroma result as a simple single-pass key.


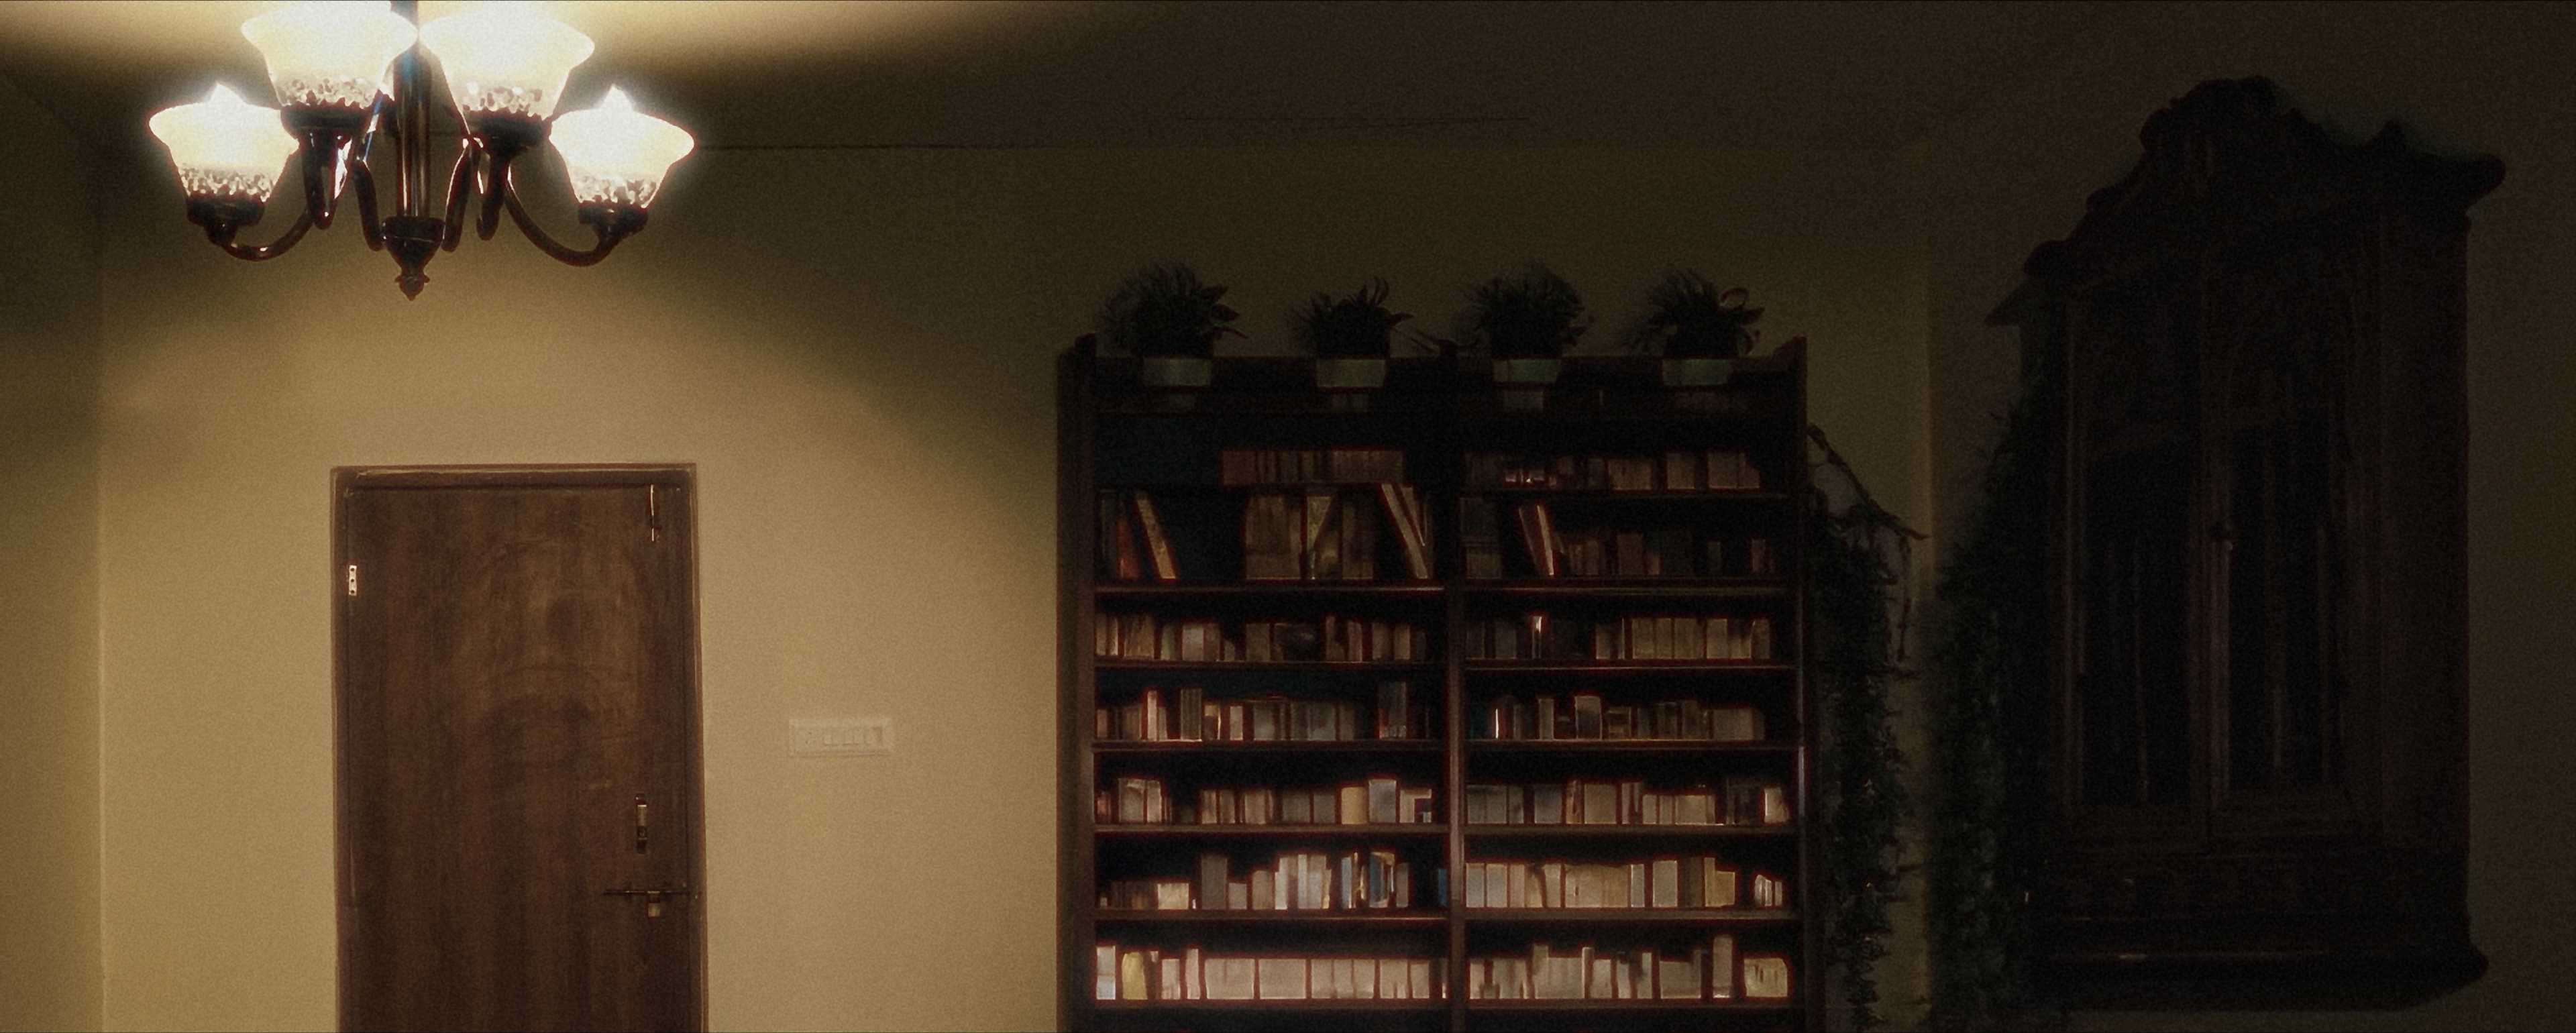
Interior Reveal — Lighting & Set Integration: Warm practical illumination, controlled contrast, and selective shadow shaping integrate the doorway with the library environment
Production Design and Modular Set Construction
The film was photographed on a custom-built modular interior set designed to serve multiple narrative spaces. One room was designed to function both as the main entrance hall and the dining hall, allowing the same physical construction to represent different locations through camera placement, dressing, set modification, and post-production extension. A second room represented the kitchen, while additional chroma-covered areas were incorporated wherever the final frame required exterior views or environmental elements that could not be physically constructed.
This modular approach reduced production requirements while increasing what could be achieved on screen. Walls could be removed, repositioned, joined, and modified according to the shot plan. The same flexibility, however, introduced another post-production issue: joining points, folds, seams, and imperfections in the modifiable walls sometimes became visible after painting and therefore required digital clean-up. I supplied the floor-plan requirements and colour specifications used by the art-direction team for set modification and painting. The set was therefore designed around the final composition rather than being treated purely as a standalone practical environment.
Kitchen Set Extension
This kitchen sequence was photographed on a compact practical set consisting primarily of the actor, counter, sink, and a single window, with the exterior view captured against chroma. The final environment was substantially expanded in Adobe After Effects using a combination of chroma keying, roto, perspective matching, tracking, and matte-painted set extensions. The original window was replaced with a digitally constructed opening and exterior environment, while additional wooden cabinets, wall-mounted storage, shelves, utensils, cookware, and architectural depth were introduced to transform the narrow practical space into a complete period kitchen. The chandelier and practical lighting were integrated into the extended environment, with the existing warm interior illumination retained as the photographic lighting reference. The actor was isolated from the chroma region using a refined key and roto corrections, allowing the new background to remain spatially continuous around the subject. Final integration involved edge refinement, colour balancing, tonal matching, and controlled grading so that the digitally constructed elements maintained the same perspective, illumination, texture response, and photographic character as the original plate.


Kitchen Composite — Screen Replacement & Grade: Green-screen replacement is integrated through edge cleanup, perspective matching, exposure balancing, and warm practical-light continuity.
Environment Design and Set Extension
The physical set represented only the structural foundation of the environment. The final rooms were substantially larger than what could be physically constructed on location. The entrance hall was extended with a large wall of bookshelves, an antique wooden cabinet, additional architectural depth, and a chandelier that became an important lighting and compositional element. These extensions were primarily executed through Photoshop matte painting and After Effects compositing, allowing the camera to retain the physical actor and practical set while expanding the surrounding architecture. The kitchen was built around a long and narrow practical table with a central window and the actor positioned near the centre of the composition. The original physical environment was extended horizontally and vertically to introduce additional storage, utensils, racks, architectural details, and a larger chandelier. The existing window design was also replaced digitally to create a more deliberate architectural structure.
The dining hall started as a comparatively small physical room containing a desk, food, and a single wide window. The final shot required the space to read as a substantially larger hall. The window proportions were redesigned digitally into a taller, narrower configuration, the table was extended, additional chairs were introduced, and the surrounding architecture was expanded through matte painting. The objective across all three environments was not to make the CG and matte-painted additions visibly impressive in isolation. The extensions had to appear as natural continuations of the photographed set, matching perspective, texture scale, light direction, colour temperature, depth, and camera geometry.
Environmental Clean-Up
The flexible nature of the physical set created unavoidable construction artifacts. Several walls contained seams, folds, and joining points that became visible after the set had been painted and modified. These areas were addressed through digital clean-up using cloned and reconstructed image information, tracked replacements, and matte-based corrections. The clean-up work was particularly important in wider compositions because small discontinuities in the walls could compromise the illusion that the physical and digital environments belonged to the same architectural space.


Exterior House Composite — Low-Light Integration: The interior window illumination is balanced against the dark exterior using localized exposure control, warm highlights, and deep environmental blacks.
VFX and Post-Production Pipeline
The post-production process was deliberately divided between several applications according to their strengths. Adobe Premiere Pro was used for editorial assembly, sound synchronization, final editing, and delivery preparation. Adobe Photoshop was used for matte painting, environment construction, frame reconstruction, set-extension artwork, the custom occult-book artwork, and the digital reconstruction required after removing the actor's head. Adobe After Effects handled the majority of compositing operations, including set extension, chroma keying, roto, tracking, blood effects, clean-up, CGI integration, portal compositing, and final shot assembly. Unreal Engine 5 was used to construct and render the digital exterior environment and selected fully digital shots. DaVinci Resolve was used for colour correction, colour grading, film-emulation treatment, atmosphere enhancement, and final output to Rec.709. The pipeline was therefore hybrid rather than linear. A shot could begin as photographed footage in Premiere Pro, move into Photoshop for matte-painting preparation, proceed into After Effects for compositing, move into Resolve for colour treatment, and in some cases return to After Effects if additional compositing was required. This iterative structure was necessary because several shots contained both VFX and CG elements that needed to be evaluated under the final colour treatment.
Matte Painting Workflow
The matte-painting process was planned before photography because the major environmental additions were already defined in the storyboard. Selected frames from the footage were exported for reference and developed in Photoshop. These matte paintings established the additional architecture, furniture, windows, bookshelves, storage areas, exterior regions, and environmental structures that were not physically available on set. The completed artwork was then brought into After Effects and integrated into the photographed plates through perspective matching, masking, roto, tracking, and compositing. The key requirement was to preserve the photographed set as the visual foundation. Matte painting was therefore used to extend spatial continuity, not simply replace the environment with a completely different digital illustration.
Dining Hall Set Extension — Pre-Ritual State
This sequence establishes the dining hall before the supernatural event and was built from a relatively minimal practical setup consisting of the actor, dining table, food, and a single wide window. The original plate was expanded through 2D matte painting and compositing in Adobe After Effects, extending the architecture laterally and vertically to create a larger, more formal dining space. The existing window was redesigned into a series of tall, narrow architectural openings, with additional seating, wall structure, and interior details introduced to establish greater depth and scale. The practical chandelier was retained as the primary interior light source, while the window treatment was developed to suggest the cool exterior night environment and provide a controlled contrast against the warmer interior illumination. The actor and practical table remained photographic anchors within the composition, with the digital extension built around their perspective, scale, and existing light interaction. Final integration relied on tracked matte layers, edge refinement, tonal matching, and controlled atmospheric grading to maintain continuity between the photographed set and the painted environment.


Dining Hall — Pre-Book Atmosphere: A restrained warm grade with cool window separation establishes the room’s baseline exposure while maintaining soft highlight roll-off and dimensional shadows.
This alternate dining-hall angle required a more substantial environmental build around the photographed actor and table. The original plate provided the subject, dining surface, and practical lighting, while the surrounding architecture was reconstructed through matte painting and 2D compositing. A full-height bookshelf was introduced along the left side to establish depth and visual weight, with additional chairs and table extension used to expand the physical scale of the room. The window geometry was replaced with a taller architectural opening, providing a controlled cool-toned exterior source against the warmer chandelier illumination. Perspective and scale were matched to the original camera plate before the extensions were integrated through tracked masks and layered matte elements. Particular attention was given to maintaining the chandelier's practical illumination across both the photographed and painted regions, followed by tonal balancing and atmospheric treatment to unify the completed environment.


Dining Hall — Character Isolation: The alternate angle uses selective tonal shaping to separate the subject from the dark wood environment while preserving the warm practical ambience.
On-Set Lighting
The lighting strategy was designed around the transition from a naturalistic interior to an increasingly supernatural red environment. Practical fixtures were positioned with diffusion placed in front of the light sources to soften their output and create a more controlled quality of illumination. Red gels were mounted separately in front of selected lights to introduce the blood-moon colour directly into the photographed scene. Although the exact fixture specifications, wattage, and colour-temperature values were not retained, the important production decision was the separation between the light source and diffusion/filtering stage. This allowed the light quality and colour influence to be controlled physically rather than relying entirely on post-production. The red illumination created on set subsequently became a key input for the grade. Instead of replacing the lighting digitally, the DI process amplified the existing physical light interaction.
Blood Moon - Establishing Shot
This wide exterior shot marks the transition into the film’s supernatural phase, with the previously established house now isolated beneath the blood moon. The environment was rendered in Unreal Engine 5, with the house, tall-grass landscape, atmospheric sky, and environmental lighting composed to preserve the large-scale isolation established in the opening frame. The scene was pushed toward a significantly darker exposure, while warm interior illumination from the house provided the primary visual contrast against the surrounding landscape. The blood-red atmospheric treatment was developed to dominate the upper environment without completely obscuring the silhouette and architectural detail of the house. Controlled volumetric atmosphere, low-key lighting, and restrained highlight bloom were used to create depth and suppress excessive environmental detail, allowing the illuminated house to remain the focal point. The final render was subsequently integrated into the film's DaVinci Resolve grade, where the red response, contrast, grain, halation, and overall density were refined to connect the CG environment with the live-action material.

Blood Moon Wide Shot — Night Grade: Deep red atmospheric tones, suppressed blacks, and controlled practical highlights create a dense low-key palette with the house isolated as the primary luminance anchor.
Dining Hall — Blood Moon Transition
This angle captures the dining hall immediately after the book is opened, using the same digitally extended architecture but with a substantially altered lighting state. The practical dining-room structure was expanded through matte painting and compositing in Adobe After Effects, while the tall arched windows were treated as the primary visual surfaces for the supernatural red illumination. The existing chandelier remained a warm practical source, creating a controlled separation between the amber interior and the saturated red light entering from outside. The actor and table were retained from the live-action plate, with the surrounding environment rebuilt to maintain the established perspective and architectural proportions. Window masks and tracked matte layers were used to isolate the individual openings and control the intensity and falloff of the red illumination, followed by tonal integration, edge refinement, and atmospheric treatment. The final grade further reinforced the transition from the previously neutral dining environment into the film's blood-moon visual state.


Dining Hall — Blood Moon Transition: Red exterior ambience is introduced through the windows while retaining warm interior sources, creating a controlled warm–red contrast for the supernatural shift.
The Occult Book Prop
The occult book was designed specifically for the project and physically developed rather than relying on a generic prop. The pages contained original hand-drawn scriptures and symbolic illustrations created using black markers with red pen detailing. The pages were manually distressed through controlled burning and tearing to create a worn, aged appearance. The visual concept was influenced by the fictional Necronomicon Ex-Mortis from the Evil Dead franchise, while the actual prop was produced specifically for this film. The book was particularly important because it acted as the narrative trigger for the supernatural transformation. Its visual treatment therefore had to communicate that it was not simply an old object but the source of the ritualistic event.


Occult Tome — Prop Detail & Interactive Light Shift: Tactile macro study of the leather-bound prop transitions into hands-on interaction, highlighting texture detail, page reveals, and progressive warm-light illumination
Demon Integration
The demon asset was initially sourced from a pre-rigged character library and then processed through Mixamo for skeletal rigging and animation retargeting. This allowed the character to be quickly adapted to the required performance without the need for manual rigging or keyframe animation from scratch. Once the base animation was applied, the character was exported in a format compatible with Unreal Engine 5, ensuring correct preservation of skeleton hierarchy, skin weights, and motion data.
Inside Unreal Engine, the demon was imported as a fully rigged skeletal mesh and placed within the digitally constructed environment. Its positioning was carefully aligned using a combination of world-space coordinates and camera-relative composition planning, ensuring that the character’s spatial relationship to the house, ground plane, and environmental scale remained physically plausible. Particular attention was given to grounding the character’s feet to the terrain using collision and alignment adjustments so that contact points did not appear to float or sink unnaturally into the surface.
Lighting within the Unreal scene was configured to match the established cinematic direction of the sequence, with emphasis on the dominant red atmospheric influence introduced by the blood moon concept. The demon’s material response was evaluated under this lighting setup to ensure that specular highlights, shadow falloff, and subsurface scattering behaved consistently with the surrounding environment. Additional light balancing was performed to prevent the character from appearing either overexposed against the darker exterior or visually detached from the ambient illumination.


Dining Hall Composite — Digital Extension & Creature Integration: Split breakdown showing the original clean set plate alongside the composited 2.5D hall extension, featuring arched window structures, chandelier placement, and character placement.
After finalising the Unreal render pass, the demon was exported as a rendered plate sequence and brought into Adobe After Effects for compositing into the live-action footage. In this stage, the integration process focused heavily on multi-layer matching between CG and plate photography, including precise scale correction to align the demon with human proportions established in the live-action shot.
Perspective matching was refined using tracked camera data and manual adjustment to ensure that the vanishing points of the CG environment aligned with the photographed lens geometry. Colour response was then adjusted through selective grading to match the Canon Log 1 footage, ensuring that the demon inherited similar tonal compression and highlight roll-off characteristics as the live-action elements.
Atmospheric integration was achieved through the addition of depth-based haze, subtle diffusion, and controlled contrast reduction in the midtones, allowing the character to sit within the volumetric space of the environment rather than appearing as a foreground overlay. Edge treatment was further refined using soft matte refinement, light wrap techniques, and controlled sharpening to eliminate any hard separation between the CG silhouette and the background plate.
The final result ensured that the demon did not read as a separate digital insert, but instead functioned as a physically present entity within the same environmental and photographic system as the live-action footage, maintaining continuity across scale, lighting, atmosphere, and camera perspective.


Dining Hall Sequence — Multi-Stage Environment Breakdown: Three-panel progression tracking the scene build from raw interior plate to preliminary background extension, concluding with final lighting integration, creature placement, and atmospheric grading.
Head Burst Sequence
The head-burst sequence was one of the most demanding compositing shots in the project and combined practical photography with extensive 2D VFX work. The scene was photographed under the same red-gel lighting used for the surrounding environment, which helped maintain continuity in the blood-moon lighting setup and provided a strong base for integrating additional blood elements in post. During compositing, the actor’s head was isolated through frame-by-frame rotoscoping and cleanly removed, creating a controlled missing-head plate while preserving motion blur and edge continuity on the shoulders and neck.
Once the head was removed, a reconstructed background patch was created in Photoshop to replace the occluded area. This patch was perspective-matched, tracked back into the plate, and blended using grain matching and colour correction so the environment remained uninterrupted behind the subject. The exposed neck region was then digitally rebuilt using layered Photoshop paintwork and texture projection, establishing a believable anatomical transition between the original plate and the post-burst state. This base was further refined in After Effects with subtle edge blending and light interaction adjustments to match the red-gel illumination.


Gore Simulation — After Effects Layer & Tracking Breakdown: Compositing workspace detailing multi-layer particle tracking, adjustment layers, timeline keyframing, and blood-splatter element integration for the sequence.
The blood simulation was constructed as a multi-layer composite rather than a single effect pass. It included high-velocity blood spray, radial burst splatter, gravity-driven drips, directional ejection streaks, surface adhesion layers, and secondary mist particles. Each element was individually timed, tracked to camera movement where necessary, and depth-separated to create spatial layering within the frame. Colour grading of the blood elements was carefully controlled to maintain consistency with the red practical lighting while still preserving contrast between fresh spray, pooled blood, and atmospheric mist. Additional interaction layers were added to the surrounding environment, including wall splatter, foreground contamination, and subtle lens-facing particulate buildup to enhance realism.
A controlled camera shake and micro-impact deformation were introduced at the moment of burst to reinforce physical force and integrate the VFX with the live-action plate. Motion blur was matched across all blood layers to ensure temporal consistency during the peak action frames. The final composite was designed to avoid a flat or single-pass blood overlay, instead building the sequence as a physically layered event with multiple interacting blood systems occurring at different depths, velocities, and temporal offsets within the same shot.


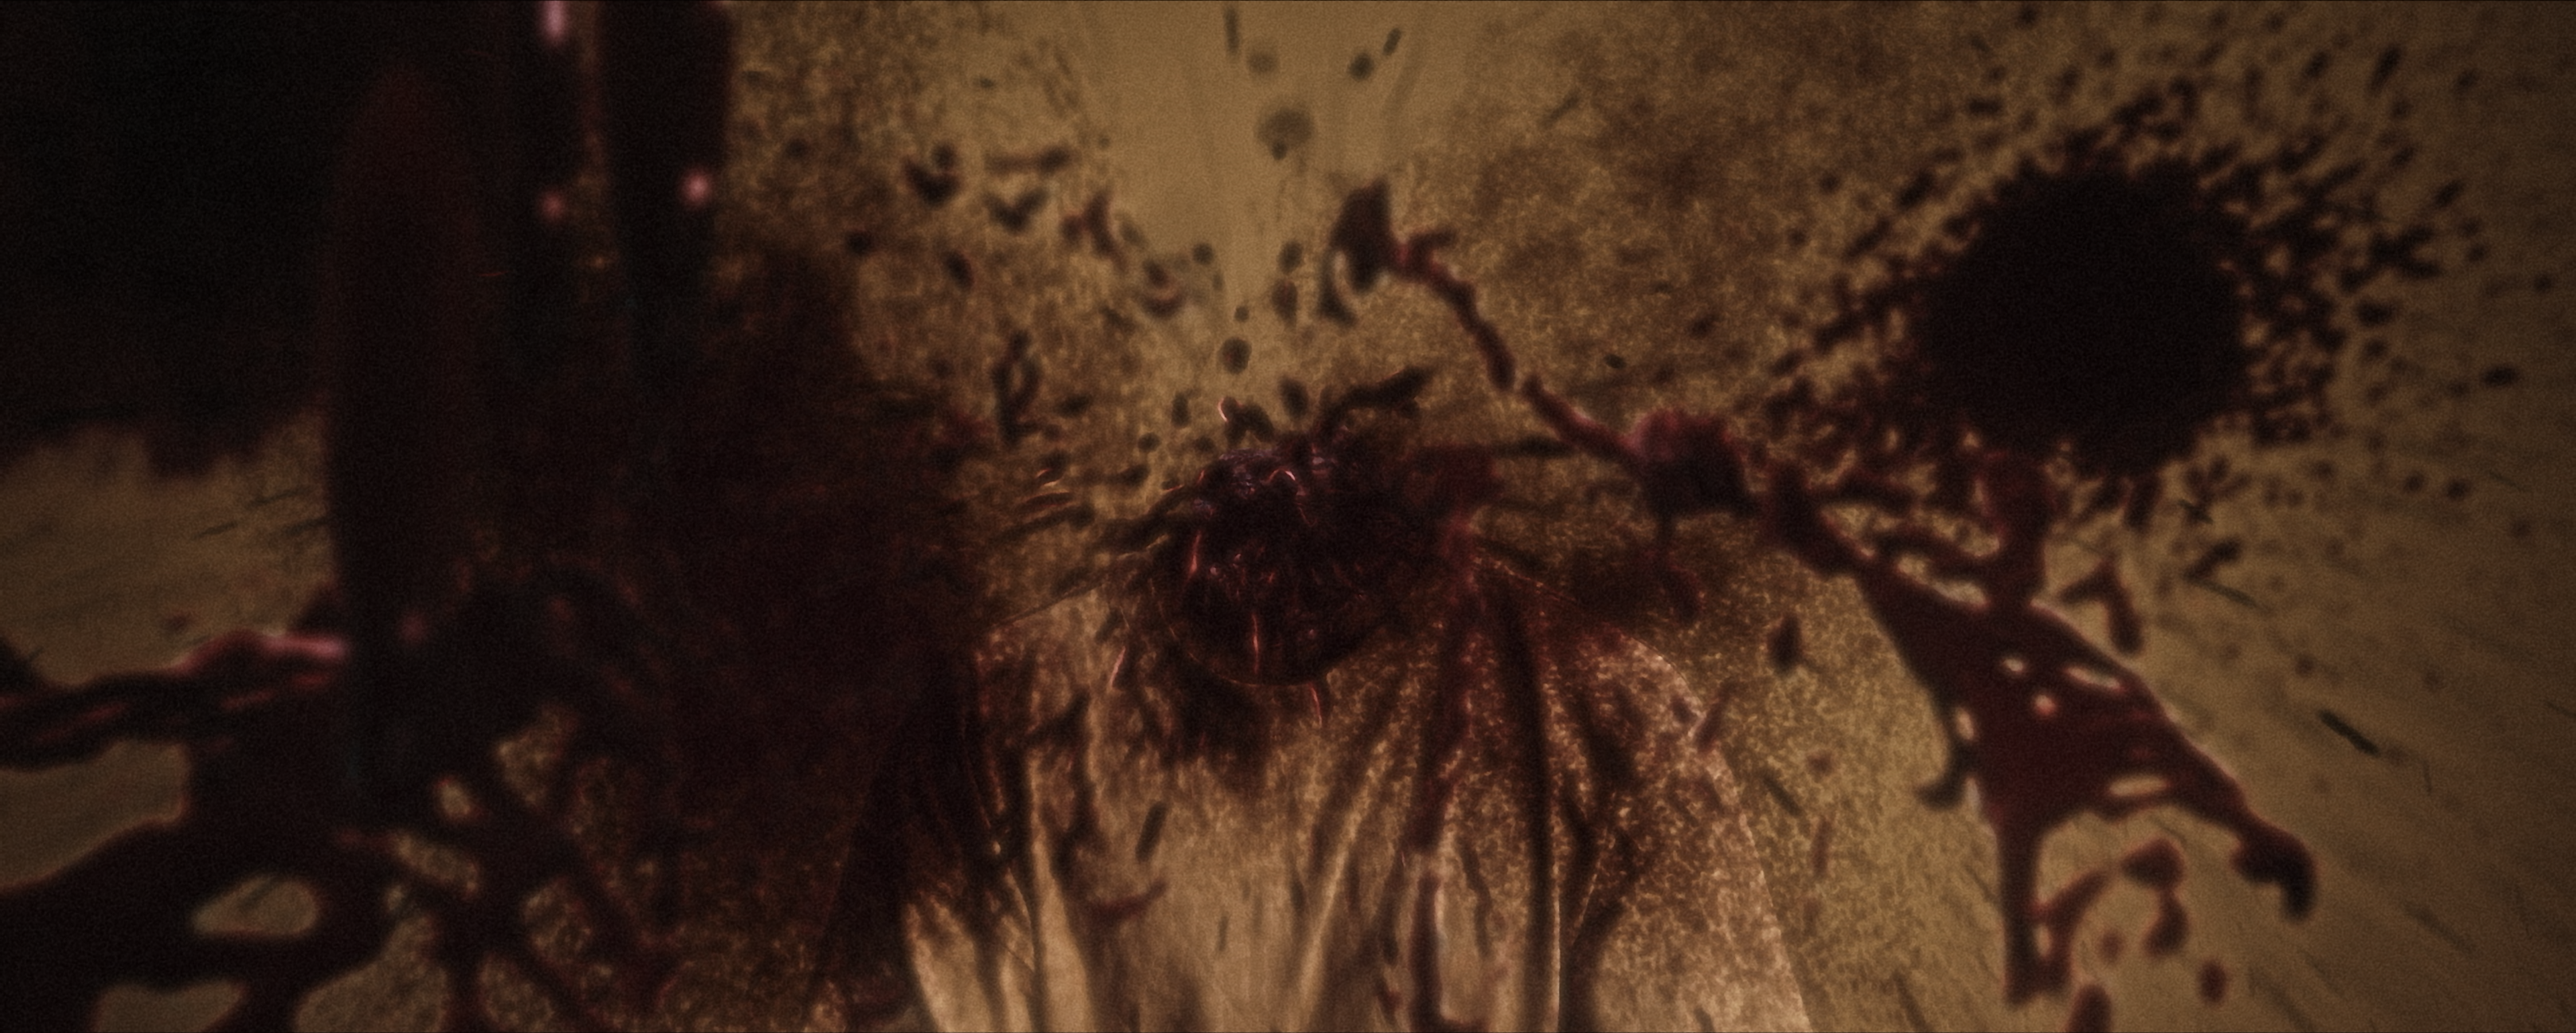

Decapitation Sequence — Visceral VFX & FX Layering: Four-frame sequence detailing the progression of a violent head burst, combining practical character plates with dense blood splatter overlays and impact timing.
Unreal Engine Environment
The exterior environment was constructed in Unreal Engine 5 to establish a scalable 3D world around the practical set and to support shots that required full environmental control beyond 2D matte painting. The primary house model was sourced from Sketchfab and integrated into the scene as the central architectural anchor, while surrounding terrain and vegetation were built using Megascans assets to ensure physically based detail consistency across ground cover, foliage density, and material response. The environment was assembled using a real-world scale workflow to maintain correct spatial proportions relative to the live-action plate.
Lighting was designed using a combination of directional light, skylight, and atmospheric fog volumes to simulate a low-light rural dusk condition, with additional emphasis on silhouette readability of the house structure. Camera placement and animation were set up to match live-action lens characteristics, ensuring correct focal length behaviour and perspective matching for compositing. The Unreal output was not intended as a final cinematic render, but as rendered environmental plates and camera-matched passes for integration into the After Effects compositing pipeline. This allowed precise control over parallax, depth layering, atmospheric falloff, and shot-specific framing requirements, particularly for exterior establishing shots and the portal sequence.


Unreal Engine 5 — CGI Environment & Asset Assembly: Development layout showing 3D character asset setup, material node graphs, foliage landscape generation, and low-light exterior lighting tests for the house scene.
Portal Sequence
The final portal sequence combined live-action performance, Unreal Engine environment construction, a digital demon, and a supernatural portal effect. The actor was photographed against a complete chroma background and subsequently isolated from the live-action plate. The resulting subject was placed into the digitally constructed environment in Unreal Engine alongside the demon and portal.The rendered environment and character material were then brought into After Effects, where the live-action subject and CG elements were composited together.
This shot represented one of the project's most complete examples of the hybrid production methodology: live-action performance + chroma extraction + Unreal Engine environment + CG character + digital effect + 2D compositing. The final composition was designed to make the transition between the real performer and the digitally constructed supernatural environment feel spatially continuous.


Blood Moon Climax — Sky Replacement & Composite Breakdown: Multi-panel breakdown illustrating keying, roto-masking, color curves, and composite assembly of the monumental red moon ritual scene.
Data Management and Media Preparation
The production was photographed in a logarithmic acquisition format, so secure media handling was treated as an important part of the post-production pipeline. The camera media was safely copied to multiple storage systems, creating redundant backups before the post-production workflow began. Footage was then reviewed against the production logs and separated into usable and unusable material. The corresponding production and sound logs were used to identify the correct takes and associated recorded audio. This prevented the editorial and VFX stages from becoming dependent on manually reconstructed shot information later in the process. The resulting media organization formed the basis for the offline edit and subsequent VFX shot preparation.


Motion Graphics & Compositing — Interface & Layout Breakdown: Workspaces showing title card design, displacement mapping, window illumination masking, and 2.5D interior set extension layering in After Effects.
Digital Intermediate (DI)
Colour Correction
All final image processing was performed in DaVinci Resolve Studio, using a node-based, non-destructive workflow designed to maintain full log latitude from the original Canon Log 1 camera negative through to final Rec.709 delivery. The entire grade was built inside a managed colour pipeline, with primary transforms applied at the beginning of the node tree to ensure consistent tonal mapping across both live-action plates and digitally generated elements (matte paintings, CG renders, and Unreal Engine plates). The correction stage began with a Color Space Transform (CST) node converting Canon Log 1 footage into a working intermediate space, followed by a second transform into a controlled Rec.709 viewing environment. Initial balancing focused on shot-to-shot normalization, where lift, gamma, and gain were adjusted to align exposure levels across all takes while preserving highlight roll-off in the practical lighting sources, particularly the red gelled fixtures used on set.
Primary correction involved structured adjustment of luma distribution and contrast curve shaping, using custom S-curves to retain shadow detail in the interior set while preventing highlight clipping in the window regions and practical light sources. Midtone density was carefully controlled to ensure that the actor remained separated from the background even after heavy VFX integration and set extension. Once global balance was established, the grade moved into secondary correction using Power Windows and tracked masks. Multiple shape-based and gradient-based masks were created and tracked across camera movement to isolate key architectural and lighting zones. These included: Window regions (to control exterior brightness and prevent overexposure in chroma-replaced areas) Chandelier and overhead practical lights (to preserve highlight structure and prevent clipping) Wall planes affected by matte painting integration (to match CG and live-action texture response) Foreground subject isolation (to maintain facial readability under shifting red lighting conditions)
Each masked region was treated with independent adjustments to temperature, tint, saturation, and local contrast, allowing fine control over how digital extensions blended with photographed elements. This was particularly important in shots where matte-painted architecture met practical set geometry, as both needed to respond identically to the same lighting conditions to avoid compositing separation. A key component of the grade was the controlled manipulation of the practical red gel lighting, which served as the narrative “blood moon” influence. Instead of replacing this effect digitally, the red channel was selectively enhanced using Hue vs Sat and Luma vs Sat curves, along with targeted RGB mixer adjustments to increase red dominance without contaminating skin tones or flattening shadow detail. In certain shots, selective channel isolation was used to push red spill into surrounding geometry, reinforcing the supernatural contamination effect while maintaining structural readability.
To unify the hybrid pipeline (live-action, matte painting, CG, and Unreal Engine renders), a global integration node was applied near the end of the tree. This stage focused on matching grain structure, black point consistency, and highlight response across all elements. Subtle film grain was introduced using Resolve’s grain tools, tuned separately for shadows, midtones, and highlights to avoid breaking clean CG surfaces while still providing perceptual cohesion. Additional attention was given to edge consistency and atmospheric depth, particularly in shots involving set extension. Slight diffusion and halation were introduced selectively around high-intensity light sources to simulate lens response and to help blend hard CG edges into photographed plates. In exterior-heavy composites, atmospheric contrast was reduced in distant elements to reinforce depth layering between practical foregrounds and digital backgrounds. Because a significant portion of the environment had been constructed through matte painting and Unreal Engine rendering, the colour correction stage functioned as a final integration and unification pass rather than a purely photographic grade. The objective was not only aesthetic consistency, but also technical alignment between multiple source formats with different dynamic ranges, texture densities, and lighting models. The final output was then conformed to Rec.709 gamma 2.4, with careful highlight protection to preserve the intensity of the blood moon lighting while ensuring broadcast-safe levels.


DaVinci Resolve — Color Node Graph & Parade Scopes: Node-based color grading setups paired with RGB parade and waveform scopes, tracking tonal balance across kitchen plates, book close-ups, wide exteriors, and the blood moon finale.
Colour Grading and Film Emulation
The final creative grade was designed to establish a warm, gloomy, oppressive horror atmosphere while maintaining separation between practical lighting, CG elements, and matte-painted extensions. The grading process was carried out in DaVinci Resolve using a node-based structure to isolate primary image adjustments from secondary creative treatments. The initial stage focused on log-to-Rec.709 balancing, where exposure normalization, highlight roll-off control, and shadow retention were adjusted to preserve detail in both the interior practical lighting and the darker exterior regions. A controlled contrast curve was then introduced to deepen midtone separation without crushing shadow information, ensuring that VFX elements such as blood, CG integration, and matte-painted architecture remained readable across all shots.
A key part of the grade involved selective colour separation, particularly in managing the interaction between the warm interior palette and the intensified red lighting introduced on set. Hue vs Hue and Hue vs Sat curves were used to isolate and subtly desaturate non-essential colour channels, allowing the red supernatural lighting to dominate without causing channel clipping or unwanted colour spill in skin tones and neutral set materials. The film-emulation layer was developed using DaVinci Resolve’s Film Look Creator, but only partially applied. Instead of enabling a full camera emulation pipeline, the treatment was broken into isolated components. Grain was applied as a separate layer, tuned to a fine structure to avoid overpowering the 1080p source resolution. Halation was selectively introduced around high-intensity highlights, particularly around the red moon lighting and practical light sources, to simulate light diffusion through a film emulsion response. Bloom was kept minimal and controlled, used only to soften extreme highlight transitions in the supernatural lighting rather than affecting the entire image.
The full camera emulation transform was intentionally avoided because the footage had already undergone extensive VFX compositing, matte painting integration, and CG layering. Applying a full LUT-based film transform at this stage would have risked compressing the carefully balanced separation between live-action plates and digital elements, especially in high-frequency areas such as blood effects and edge-heavy compositing regions. A selective desaturation pass was introduced near the end of the node tree to further refine tonal hierarchy. This was applied using luminance-based qualifiers to ensure that saturation reduction affected only midtone and shadow regions, while preserving controlled colour intensity in key narrative elements such as the red lighting, blood effects, and the occult book. The final output transform was then converted to Rec.709, with additional soft clipping applied to prevent highlight roll-off artifacts in high-intensity areas such as the portal sequence and practical light sources.
As a final enhancement step, DaVinci Resolve’s Relight tool was tested on selected shots to subtly reinforce spatial lighting direction. This was primarily used around matte-painted architectural extensions such as windows, chandeliers, and deep interior recesses. The relighting pass was kept subtle and directional, ensuring it functioned as an atmospheric reinforcement rather than a visible relighting effect, helping unify CG, matte painting, and live-action elements under a consistent supernatural lighting logic.
Editorial and Sound
Once the VFX and colour work were completed, the approved material was returned to Adobe Premiere Pro for final assembly. The editorial stage included the final cut, sound synchronization, sound design, title animation, animated name cards, credits, and location/time cards. Sound recorded during production was identified from the sound logs and synchronized with the selected takes. Additional sound-design decisions were then developed to support the escalating horror atmosphere. The final editorial was therefore treated as part of the VFX process rather than as a completely separate stage. Timing decisions influenced the pacing of the supernatural transformation, while the timing of VFX events such as the head burst, blood impacts, portal opening, and demon movement needed to remain synchronized with the edit and sound design.


Premiere Pro — Timeline Structure & Master Assembly: Multi-track NLE layout showing video timeline organization, audio mixing channels, adjustment layer stacks, and final playback monitoring across key project beats.
Production Constraints and Problem Solving
The project was intentionally ambitious relative to its production resources. Principal photography was completed in one day, while post-production was limited to approximately one week, following approximately three weeks of pre-production. The physical set was also substantially smaller than the environments required by the script. Building every room and architectural element practically would have been inefficient and incompatible with the available schedule. The solution was to treat the physical set as a photographic foundation and design the rest of the environment around it digitally. Set extension, matte painting, chroma replacement, Unreal Engine environments, and digital clean-up became part of the original production strategy rather than emergency fixes added after shooting.
This planning approach significantly reduced the amount of physical construction required while allowing the final film to present environments substantially larger than the available studio space. The project also required careful prioritization of VFX complexity. Because post-production was performed solo, every shot had to be evaluated according to its narrative importance, technical requirements, and available time. Stable camera compositions, controlled lighting, pre-planned matte-painting frames, and reusable environmental structures were therefore deliberate decisions designed to keep the pipeline manageable.
Post-Production Methodology
The overall workflow can be summarized as a hybrid live-action + matte-painting + CG + compositing + DI pipeline. The production began with carefully planned photography designed around the eventual VFX requirements. Once the footage was secured and organized, selected takes were assembled and prepared for VFX. Matte-painted elements were developed in Photoshop, environmental and CG material was generated through Unreal Engine, and the majority of shot compositing was executed in After Effects.
Completed visual shots were then evaluated in DaVinci Resolve for colour correction and creative grading. Where a shot required additional compositing after grading or additional rendered elements, it was returned to After Effects and subsequently re-integrated into the final colour pipeline. Premiere Pro remained the editorial and final assembly environment, providing the overall structure into which picture, VFX, sound, titles, and credits were brought together for final delivery. The workflow was therefore intentionally iterative, with each stage feeding the next rather than following a rigid single-pass pipeline.
What We Learned From the Project
Blood Moon Rituals was my first VFX project and functioned as a practical introduction to the relationship between production design, cinematography, compositing, CGI, environment construction, and DI. The most important lesson was that convincing VFX begins before the camera rolls. The quality of the final composite was heavily influenced by decisions made during storyboarding, set construction, camera placement, lighting, chroma positioning, and environment planning.
The project also established an approach that continues to influence my work: build only what needs to exist physically, design what can be controlled digitally, and make both systems behave as one environment. The production demonstrated how a relatively small physical set can be expanded into a much larger cinematic world when the VFX strategy is incorporated into the visual development and production process from the beginning.
Outcome
Despite the limited crew, one-day shoot, seven-day post-production window, and the fact that this was my first VFX project, Blood Moon Rituals achieved the intended visual objective of transforming a compact practical set into a larger supernatural environment through a combination of live-action photography, matte painting, compositing, CGI, Unreal Engine, and digital colour finishing. The project was subsequently nominated at the Ahmedabad Film Festival for Best VFX in a Student Film.
More importantly, the project established the foundation for my later work in VFX, environment design, CGI, compositing, and DI colour grading, and demonstrated the value of treating every visual decision—from set construction and lens choice to matte painting and final colour—as part of one continuous image-making pipeline.
